Search This Blog

Wednesday, 27 March 2013

The Annals of Linnius Chapter 7: Besieged!


It is now late Summer in the 473rd year after the birth of our Lord and Blessed Saviour Jesus Christ. I, Publicus Librarius, scribe to his Royal Majesty King Mascuidius of Linnius do chronicle the days of kingdom and the coming of the dread Saex.

“Oh woeful day!! The wailing of women and babes in arms is fearful to our ears! The cries of wounded soldiery doth grip my soul and break my spirit! Can it be that Our Lord and Saviour has deserted us? Is the Day of Judgement at hand?
Scarce days ago our brave forces did engage the Saex in battle North of the city.  The omens were poor, as the army had been severely bested in a previous encounter on the road. Morale was low among the soldiery and the Praefectus Andrucius was heard openly challenging his Majesty King Mascuidius in his view about meeting the Saex in open field. However, one does not argue long with his majesty and live and so it was that the Praefectus led the army to battle.
The day opened with a challenge of champions in the Old Stone Circle and thus it was that Bedwyr of the swift sword, son of Emrys of the Saxon Shore, Slayer of Franks, Goths and Burgundians, protector of the legacy of Rome, bodyguard to Praefectus Andrucius did step forth to fight. Long was the duel that day and by God’s mercy, Bedwyr did triumph! This did raise the morale of the army in significant measure, but not enough to guarantee victory.

The shieldwall did form atop the great hills, but it availed not! The Saex, bolstered by heathen warriors from across the Irish Sea did outflank the shieldwall, doing mighty execution and forcing our warriors from the field in ignominious rout. Never has the like been seen in the days of our kingdom!

Now we are besieged within the city. The Praefectus assures us that the walls will hold for long enough to regain the strength of our army and that we shall then break out and drive them from our lands once more – “Remember the Great Victory!” he cries. “We have bested them once and we can do so again. Yet, this is but a hollow boast. The Saex have bested us in near enough every encounter. There are those within the kingdom who speak of abandoning our lands and seeking sanctuary across the Saxon Sea in the land of the Bretons. Privately, I believe the Praefectus agrees with them!

The Praefectus has visited me this past evening, as I tended the wounded. We talked at great length. He fears that he only retains his title, his lands, his role as army commander (and indeed his head) because there are no others to take his place. He fears the Saex Lord, who fights more like a Roman than a barbarian. Not for this Saxon the mad rush into the shieldwall, but rather a measured approach to the battle, the wide outflanking move, the discipline in his warriors not to attack until the very best moment. This man is a dangerous enemy. The Praefectus also informs me that new warrior bands have joined the Saex to join in their glory and in our slaughter. This makes it even harder for us to win the day. How can we take them on with the levy, when they are both better warriors and fight with greater discipline?

The Praefectus is a man who now keeps only his own company. He will do as he says and lead the army out to fight another day. What will happen on that day, only our Lord and Blessed Saviour knows…”

Have you ever had one of those games where it goes wrong on the very first move and gets dramatically worse from there on in? Oh, and you can’t actually stop it happening because you descend into ‘muppetville’ and ‘buffoon-land’ where each new decision you take is even more stupid than the last? No? Lucky you! It happened to me on Monday as Mike and I got together to play Dux Britanniarum at wargames club. I had played Dux Bellorum 3 weeks in a row and Black Powder before that and had entirely forgotten some very key facts about how to play these rules. And I was simply stoopid!!!!!!!!

I deployed badly, played woefully and lost massively, all helped by the fact that Mike deployed well, played exceptionally well and gained a victory to match! Horrible, horrible, horrible! Oh, AND I had some really shite dice as well! And Mike didn't, not this time... A whopping 6 point defeat leaving the campaign squarely in Mike’s hands. I have no cash to recruit mercenaries or do anything. He has foederati skirmishers AND an extra 6 warriors, meaning that, in every battle from now on, he is almost bound to win, as I have to stay in shieldwall to have any chance, but as soon as I do, he’ll outflank and destroy me again. My only hope is to make some evil terrain to anchor my flanks on and to completely reconsider my entire approach to the game, not an easy thing to do!! I do have one tiny plan I intend to try, but that’s a secret as Mike will be reading this!!!

And that’s all I’ll say about it… I didn’t enjoy it at all, simply because I knew I was playing really badly but couldn’t seem to stop myself…horrible!!!!! Still, good job I was playing with Mike as he doesn’t gloat at all, which was very kind of him!!!

Anyway, we reconvene after Salute for the attempted break out!

Here’s some pics of my ignominious demise…

Duel of Champions!!!

VICTORY!!!

Deployment...


Flanking move developing...


Even now it ain't a disaster...

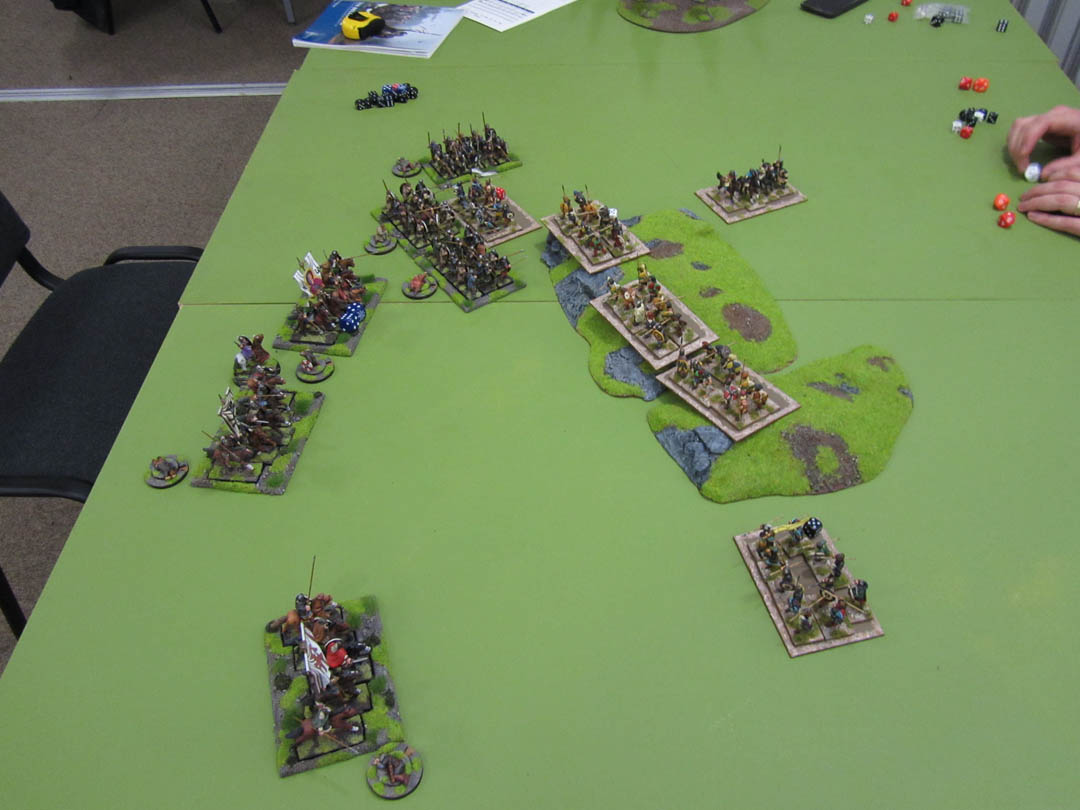
Just before it all went wrong! I now charge off the hill to hit the flankers as they emerge from a wood, with Aggressive charge and everything....Good plan...except that I am FORGETTING THAT IT'S MINUS 1 TO F**KING HIT WHEN THE ENEMY ARE IN A WOOD!!! DOH!!!! AND, SHIELDWALL IS BRILLIANT ON A HILL... AND I'M NOT IN SHIELDWALL, OR ON A HILL ANYMORE.....ARRRGH!!! Muppet!!!!
Result...Hearthguard routed, warriors all dead and morale on 0!!! Ooops...

Monday, 25 March 2013

81,000 Views!!!!

Blimey!! 81,000 views!! Seems like only a week ago it was 75,000! Lots of you must visit very regularly and for that I thank you all very much! I'm so glad that my hobby adventures provide you with something to follow...and that you all leep coming back. Thank you all so very much 
:-)

Next up, tales of a disaster of global proportions in the Dux Britanniarum campaign, followed by yet more Dux Bellorum and maybe even some more painting!! I have a Saxon standard bearer, some more Elves and some Colonial Sikhs in various stages of semi-completion and I am considering painting some Huns to use as horse archers with a Late Roman army in Dux Bellorum...(yup, Dux Bellorum is the current 'must play more' set here at GeetarheroTowers...)

Tuesday, 19 March 2013

More Dux Bellorum...

So, after my first foray into Dux Bellorum with Grahame on my last post (BTW, apologies for not publishing the comments...I had no email notification that they'd arrived...bizarre!), I settled into two games last Monday and yesterday against Andy 'Colin of Romford' MacTaggart (in-joke for the folk who attended the WI Battle Of Catraeth sessions...sorry!) and his Saxons.

This was a much more satisfactory set of games, as he knew a bit more about the rules than me and, between us, we got pretty much everything right over the two games, or so we reckon!!

In the first game, I took the same army that I played against Grahame's Picts. It was an interesting encounter, as Andy had paid for extra leadership points and it was these, plus excellent tactical play that saw him avoid my shieldwall and focus on my cavalry, that won him the battle. It was here that I learned a real lesson about Dux Bellorum - Leadership Points matter! As mine whittled away, Andy kept his coming and in the end I lost without really doing him much damage.

Basically, Andy made me fight where he wanted me to and I was unable to get myself back into it. I lost leadership points early due to weaker units dying and then struggled with poor bravery tests. I did manage to kill some Saxons at the end, but, in dying, they destroyed my noble cavalry and I was left at less than 50% of my starting strength. At this point it was getting late so we agreed Andy had won - it would only have been a matter of time!

Another lesson here was that, where my shieldwall did fight, it held on forever! We play the optional rule about limiting leadership points that can be used to cancel out hits, but even so, the shieldwall appeared impenetrable until flanked, at which point it rightly crumbled and died. However, in this game, I used my shieldwall like I would in WAB, which isn't really what you need to do in Dux Bellorum as you can actually be more aggressive with it - a tactic I determined to try in the game yesterday.

Here are the pics from game one:

Deployment...

My advance on the right , as Andy's Saxons manoeuvre to avoid the shieldwall

Saxon skirmishers gone and their noble cavalry plunge into my shieldwall

The Saxon nobles' brave sacrifice is buying the Saxon infantry time in their attempt to focus on my right flank...

My cavalry engage the Saxons on the crest of the hill...

...and withdraw when the heat gets a bit much!

Aha!! I have shieldwall flanking the enemy...but they fail several bravery tests in a row and cannot charge!! Arrgh!!! Meanwhile, the Saxons' inexorable advance on my right continues...

In trouble now!!!

Flanked...

Game over...
So, to game two last night! My first task was to learn from the lessons of game one and reshape my army. I removed the 'Imposing Horsemen' rule, as it didn't work for me at this point in my Dux Bellorum career! I also decided to add another shieldwall. So this is the force I took:

Mtd Companions
1 x Noble Riders
1 x Riders
1 x Noble shieldwall
3 x shieldwall
2 x bow armed skirmishers

This left me 3 points short, so I purchased 'Monks', which gives me 2 additional leadership points anywhere within 5 BW (20") of the monks unit. It's a risk, as the monks have low bravery so will rarely move and they are obviously easy to destroy.

Andy took a small force with no skirmishers, but he purchased 3 extra leadership points (giving him 9 in total!) However this left him a little outnumbered!

Deployment in game 2
My plan this time was to advance the shieldwall onto the hill and try to force the Saxon warriors to make uncontrolled charges early on so I could pin them and work the flanks. This was a good strategy, but very nearly came unstuck as Andy tried to repeat his previous tactics...


'Arthur' charged his Companions into the Saxon noble cavalry and delivered a mighty 4 hits, reducing its cohesion to 1, although the Saxon companions returned the favour and caused two hits on Arthur's unit (this is the beauty of this system - I launched all my attacks on the cavalry, as companions are only hit on a 6, whereas nobles are hit on 5+. Andy used his companions as his main unit and the cavalry as supports, so his companions loaded up attacks and his cavalry only got one D6 as a supporting unit. As they suffered more than 2 hits they were forced to withdraw...) On the hill, the combats went Andy's way with a STAGGERING succession of 6s on the shieldwall, forcing it back so it was now fighting uphill and dangerously low on cohesion. I now feared that he would punch through my centre and it would be game over...

The combats go Andy's way, but my noble riders are making a WIDE flanking move on my right...
Fearing the worst, I hunkered down with the shieldwall, allocating leadership points to soak up hits and keep them in the game, while, at the same time, working the flanks. This resulted in the shieldwall holding, although I was unable to damage the Saxon warriors at all. My noble shieldwall being particularly ineffective. Also, my riders on the left failed a Bravery test and were unable to mover into a flanking position!!! Curses...!!! However, in my next turn, on my right, my noble cavalry charged and beat back the Saxon warriors, while Arthur conducted a fighting withdrawal. In the centre, the shieldwall held (I even managed to inflict damage on the right-most Saxon unit) and I FINALLY got those riders into position to flank the Saxons! See below! The key to all of this was those extra leadership points. I was literally using them all to keep myself in this...

It's all coming together...
In the next turn, all hell broke loose! My noble cavalry failed a bravery test and were uncontrollably charged by the Saxon warriors. However, in the ensuing combat, the nobles redeemed themselves with kick-ass combat dice and the Saxons were obliterated. Arthur obliterated the Saxon cavalry and survived the Saxon Companions' attack, albeit with only 2 cohesion points remaining. On my left, the riders launched their flank charge with 3 extra leadership dice to boost their assault. This crushed the rightmost Saxon unit, leaving it down to 1 cohesion point. It was forced to withdraw away from the charge, found its way blocked by friends engaged in combat and therefore suffered one more cohesion hit, bringing it to 0 and making it rout. In one round of combat, Andy was now down by 3 leadership points and worse was to come, as he was also at 50% strength so had to take morale tests...

It's beginning to go Arthur's way...
This resulted in one more unit routing as it failed its morale test. This is what it looked like at this point...


This left me free to flank-charge the remaining Saxon warrior unit with the jubilant riders who obliterated them and I rear-charged the Saxon companions with the noble cavalry - it was a risk, as they were down to 2 cohesion. It didn't pay off. I got the Saxons down to cohesion 2, but my nobles routed. However, at this point, Andy was down past breaking point. Game over and victory to Arthur!!!! 


It looks like a massacre, but every one of my units is sitting there at cohesion 1 or 2, so that just shows how close it actually was!! The plan had worked. The extra leadership points from the Monks kept the shieldwalls fighting for long enough to allow the flank attack that rolled up the Saxon line. The shieldwall didn't cause many hits, but they did cause enough so that, when the flank attack came in at full pelt, it obliterated the Saxon units. 

Wow...What a great couple of games!! I do like these rules. They play a little like Hail Caesar in that movement is free and fluid if units are working individually. If units are grouped (and you can group them yourself on deployment or they group automatically if moving into 'legal group position) they are more restricted, but are more likely to pass bravery tests (they always test on the highest in the group). The one odd bit about movement is that there's a funny bit in the rules about 180 degree turns. Groups can turn through 180 at the cost of one basewidth movement, which is fine. However, it also says that units can do that...which is weird as this seems unnecessary because they can move any direction when operating individually... Perhaps Dan will enlighten us...

The game has real Dark Age flavour - troops have to pass a Bravery test to move and leadership is crucial - this represents the nobles in charge cajoling their men into action. I like the fact that 'kills' in combat represent   loss of combat cohesion, both men dead and loss of 'will to fight'. This negates the need to constant morale tests and means that you will never get the 'WAB moment' where an unlucky panic test results in your entire army fleeing at the end of turn 1!!!

The whole 'leadership points' thing is what makes the game. It really makes you think! Great idea - simple, but oh so effective! Well done Mr Mersey!!!!

I can see myself playing this very regularly if I can find folk to play with, as it really is great fun! I am now looking forward to trying a scenario-based approach, as, like all these Dark Age games, the real longevity is in creating 'period-specific' scenarios. There are a fair few in the book, but I reckon I can come up with a few others too.

Highly recommended to Arthurian gamers everywhere!! If you are at Salute, do come and find us! The army above is the one you'll see on the day, fighting yet more Saxons... 

Friday, 8 March 2013

First Game of Dux Bellorum

On Monday, Grahame and I played our first game of Dux Bellorum, the Osprey Arthurian rules by Dan Mersey. Grahame had been a at a WAB tourney all weekend and I had had a LONG day at work, so brains were frazzled even before we started. Grahame brought along Picts to take on Arthur in a wooded landscape (Cat Coit Celidon??)

We found it a bit tricky getting to grips with things, getting all mixed up about units, groups and their respective movement ability. We struggled to work out some combat situations regarding uncontrolled charges. We also completely neglected to do combat resolutions, (we were very brain-dead!) and messed up some of the combat modifiers for woods, flanks, etc.

However, despite all of that, by the end, we were finding our way through much easier and I really enjoyed myself. When I actually play a game 'properly', I think the rules will work really well. I do like the Leadership Points allocation bit in particular...

What I did find tricky was the way that being aggressor or repeller influences the game play. I was aggressor in this game, so was generally going first for everything, but that in turn meant that I had to think about what Grahame would do in response all the time. Also, I deployed first  for each troop-type, meaning that Grahame could avoid my shieldwall and focus his warriors on my cavalry!! This didn't go well in the end as, although they were all on-table at the end, their cohesion was shot. It was that that lost me the game, as we didn't play to a conclusion so counted cohesion points on-table at the end and I had less!!

Here's the pics I took. The armies look good on the sabot bases and I'm pleased with my cohesion markers.
Overall, I liked it MUCH better than I thought I might (Grahame commented that it is very 'Phil Barker' in style and I do not enjoy that sort of game normally) and I can see myself playing fairly regularly if opponents are available at the club. I'll do a batrep after me and Andy 'Colin of Rom - Ford' MacTaggart play on Monday night...

Deployment

The armies advance

My shieldwall can't even overcome skirmishers!!!! This was a drawn combat!

Getting to the end...my shieldwall lost a unit after this and we called it with me losing on cohesion pts
 

Tuesday, 19 February 2013

Dux Bellorum Romano-British for Salute

Ok, so at long last, I can post something related to 'the other Dux B', or Osprey's 'Dux Bellorum'. Yes, I have agreed to join the supremos of Arthurian Wargaming (James Morris & Steve Jones, of course), plus a number of the other 'usual suspects, in demoing Dan Mersey's Dux Bellorum at Salute this year.

And, after a bit of to-ing and fro-ing about the hows, whys and wherefores, here are the new bases for the job!! For those of you who don't know, Dux Bellorum is an element-based game that relies heavily on the base size as a key measure for deployment and movement. We have agreed that we will use 120mm wide bases as they 'look about right' for 28mm (according to sir Steve of Jones on his blog and I have to agree that he is bang on the money there!)  However, as 120mm is a pain in the arse for movement purposes, we are using the good old traditional 4" as our equivalent of 'base-width' when moving troops.

You may recall me buying a load of sabot bases from Warbases ages ago for this purpose and that is largely what I have here. The only difference is that I decided once I'd got them that 4 models on a 120mm wide base looked absolutely crap for noble and companion cavalry. Accordingly, I fashioned '5 men per base' sabots for said cavalry using GW movement trays with balsa inserts, gaps filled with Green Stuff. These look great and are only a tiny bit over 120mm...not enough to worry about!

Here are the empty sabot bases I'll be using...

Home-made Companion/Noble Rider cavalry element base

WarbasesShieldwall infantry base - Close order foot

Warbases Bow base- I opted for a looser formation for this base to simulate medium infantry in slightly more open order

Originally planned as a Rider base, I opted to use this Warbases cavalry base for the skirmishing cavalry

Light troops - Romano-British Bow and Skirmishing Cavalry

Shieldwall Infantry

The 'main event' - Arthur's Companions (front) and Noble Riders behind

With regard to the army, I have been asked to supply 'Arthur's army' for a straightforward 32pts per side (standard army size) 'Arfur vs the Saxons' game while the others do some kind of mega game. This suits me down to the ground, so I have designed the following army. Clearly it is not one iota historical, but it is, nonetheless, what most people will expect to see from any game involving Arthur!!!

We have:
1 x unit of mounted Companions (kick-ass heavily armoured cavalry) led by the Man Himself (5pts)
2 x units of Noble Riders (armoured noble cavalry) @ 5pts each (10pts)
3 x units of ordinary Shieldwall infantry @ 3pts each (9pts)
1 x unit of Romano-British Bow (3pts)
1 x unit of Skirmishing Light cavalry with javelins (2pts)

This comes to 29pts, allowing me to add the strategem 'Imposing Horsemen' to make my Companions and Noble Riders even harder in combat for the additional 3pts.

When choosing models for the units, I opted to include my classic Romano-British 'Mounted Arthur' model to denote the unit of Companions (even though it's not 'necessary' - it just can't be Arthur's army without him!) and the Noble units are denoted by banners. This makes it easier to remember in the heat of battle which units are which should I ever opt to mix noble and non-noble units of the same type within an army.


So, there you have it...the 'Dux Bellorum' Army of Arthur as you might see it in Rosemary Sutcliff's books: Shedloads of rock-hard cavalry backed up by spearmen and a few light troops...Classic Arthur!!

All I have to do is learn to play the game and learn how to use the army now... all in about 2 months...less, actually as my first game is on 4th March!!! Yikes!!! I hope Dan is on hand on the day for the first run-through!!!!!

Sunday, 10 February 2013

More Middle Earth Stuff...HILL TROLL!!!!

This is a such a bloody great model!! Despite GW's issues, they do make some lovely stuff and this troll just OOZES character! It'll be a centrepiece of my Fantasy Dux  Evil army. I even painted it just like the GW scheme, simply cos I love the combo of browns....


The painting table currently contains a Saxon standard bearer and a bunch of GW LOTR Orcs... Progress hopefully on all these by next weekend, all being well, although I do have to get my Dux Bellorum bases done, as Salute ain't far away and I haven't even played a game yet!!!!

Thursday, 7 February 2013

The Annals of Linnius Chapter 6: Disaster On The Road

It is now mid Summer in the 473rd year after the birth of our Lord and Blessed Saviour Jesus Christ. I, Publicus Librarius, scribe to his Royal Majesty King Mascuidius of Linnius do chronicle the days of kingdom and the coming of the dread Saex.

"Disaster! Calamity! The day of reckoning is at hand! The Praefectus's army is slaughtered...His majesty the king is beside himself with anger and despair! Doom beckons for our fair kingdom!

The Praefectus Andrucius is a man of honesty and integrity. He doth not spin webs of lies and falsehood where truth is required. While the official records published by our king may tell tales of minor defeat and setback, the Praefectus' words to me, and hence the words recorded here in the annals of our time, doth speak of disaster - 'the Great Defeat' he calls it. For, much as we beat the Saex in months past in the Great Victory, now they have repaid us in kind.

The Saex did catch the Praefectus' men unawares on the road to a small fortification not far from Stalling-by-Humbre, scene of a previous encounter. The Praefectus' force was escorting a waggon train filled with munitions of war when it was assailed by the Saex in mighty fashion. Strung out along the road, caught unawares and outnumbered, the Praefectus attempted to organise a defence, but it was swept away by the swiftness and ferocity of the Saex assault. The Praefectus himself sustained a wound while leading a desperate and valiant counter-attack that left the Saex Lord's Hearthguard decimated. However, this was the only success on that sorry day. The milites were slaughtered while attempting to form a coherent defence and the waggons were lost, abandoned by the Praefectus as he valiantly attempted to extricate the remaining men of his army from what was fast becoming a massacre. 

His majesty King Mascuidius doth speak openly in question of the Praefectus' courage, but the surviving men of his army treat this with the contempt it truly deserves. No commander should fight on when all is lost, only risking further destruction and death.

Worse was to come in the retreat, however, as many of the levy, hastening from the fort to rescue the main force, were cut down by Saex patrols as they fled. Even worse, some local populace, seeing in the rout an opportunity for loot, slew the wounded as they struggled away from the carnage. It is only by the grace of God that the Saex Lord allowed our men to leave the field without full pursuit.

Now, we await the day of reckoning. The Saex have raided unopposed this past month while we rebuild our forces. We expect the summons to full-scale battle any day. The omens are not good. It is clear that the Saex are in the ascendancy, for they have now bested our forces in 4 out the 6 main encounters.

We pray to God that, come the day of full battle, our men may be granted victory and the province saved..."


Blimey...this was a tough one!!! This scenario is very tough for the British. Your force is divided, the waggons come on dead centre of the short table edge with no idea where the Saxons will enter. The fact that formations can't be deployed in column means that ensuring a good defence is difficult and you have a LONG way to go to reach safety!!

This was compounded in my case by the Saxons arriving in the best place for them and the worst for me - the only part of the table where they could attack unencumbered by terrain.

I made a huge error in deployment. Mike and I talked for ages about this afterwards and, at the time, couldn't see how I could have played it differently, but I can now see. 

I deployed my 2 formations at the head of the train, advancing down the table. 
British deployment...Andy's first error...
My destination...a bloody long way away!!!

When the Saxons came on, in effect to the rear/flank of my nearest formation (warriors and levy nearest camera above) it meant that I had to do a load of juggling to effect a battle line. It also meant that the troops were perilously close to the Saxons arriving - luckily only one group arrived in the vanguard. I should have deployed the groups separately, each in column alongside the waggons. I could then have been further away from the Saxon attack wherever they came on to the table and could have formed up in the first turn.

However, I didn't, so was stuck with the deployment above. So, what did I do? Turn the nearest formation to face and try to bring the Lord and his elite/warrior formation across the front of the train to form a defence. 

My rather pointless and very flimsy shieldwall...
Here comes trouble...

What a bloody idiotic thing to do! It slowed the waggon train down, thereby rendering it more open to attack. Not only that, but I would never really have had a cat in hell's chance of getting the troops over in time, as the rest of the Saxons would arrive on turn 2. Which they did...

What happened was that the Saxon vanguard ignored my shieldwall and charged through the gap beside them to capture the nearest waggon, then turned and in turn two, activating ahead of the shieldwall, charged it in the flank, DECIMATING it. 

(Adopts best guttural Saxon accent) "Oooohhh we got us a waggon, boss"... 
"RUN AWAY!!!!!!!!!"

(Adopts best Saxon accent again) "WAHAAAAYYYY!!! A British shieldwall showing us its flank, lads...CHARGE"

Ok, so we played that wrong as it turned out (see LENGTHY discussion on the Lardie Yahoo group!) but the result was nearly the same. It meant that the enemy vanguard were in range of my elites, who launched a catastrophic 'strong arm' volley (4 shock caused on the Saxon elites) before wading in and kicking serious arse in the combat. Of course, I lost a man and of course I rolled a 1 and of course I forgot to replace the dead warrior once I'd transferred the casualty to my Lord...DOH!

A moment of small comfort...Saxon Hearthguard, amphorae lost, running like b*ggery!!
Wagons excaping (Hurrah!) What you can't see, out of shot to the left, is my entire army about to twatticated (and yes, that is a word...at least, it is now!!!) by a HUGE formation of hairy-bottomed Germanic types...sigh...
I then found myself facing off a huge mass formation of 3 groups (2 Saxon warriors and 1 elite) who trashed my remaining warriors and tried to trash my Elites - thank goodness for an 'evade' card!! At this point, although the waggon train was getting away, I was being picked off piecemeal, my elites were heavily shocked with only a status 2 lord leading them and I was already down 14 men, so liable to lose by 3pts (I'd killed 6 Saxons). So I quit... Mike let me go, but by withdrawing on  neutral or enemy table edges, I lost 4 more men!!!! So  a 4pt defeat!! Bloody hell!!

Time to call it a day, lads!!!!

I clearly should not have fought. I should have withdrawn my units facing the enemy, keeping the waggons going full speed. I should have given myself time to do what I do best - fight in bloody great shieldwalls from the front, or not fight at all. BY electing to fight, I allowed Mike to play his game perfectly (which he did, it must be noted...) and destroy me piecemeal. It wasn't pretty!!!! I was forced to dance to Mike';s tune throughout...and I am a shite dancer!! :-) If I had withdrawn, much of his force would have either had to circumnavigate a HUGE wood or be slowed down going through it...I may have been able to do it...just maybe!!

So, Mike is now 4 - 2 up in wins, with each of us having one big win apiece. I have no cash left and he will have enough to challenge for battle on Monday. I'll be down on morale after a defeat...he'll be able to hire mercenaries as well as field 2 extra warriors, so I'll be outgunned as well. I fear the Northern province may well be lost!!! I will have to seriously think about my tactics come the big battle...